User Tools
Page Contents
Dealing with Leaks
This section explains what a leak is, why leaks are important, how they are found and fixed, and how leaks are prevented.
What is a Leak?
Maps created for the Cafu engine are preprocessed by several compile tools (e.g. CaBSP, CaPVS, CaLight) for optimal performance. These compile tools assume that any map has an inside (where the player and monsters are), and an outside that nobody except for the mapper will ever see. The inside must be sealed “air-tight” or “water-tight” from the outside.
That is, if you imagine you flood-filled the map from the inside with water or pressurized air, at no point must the water or air be able to escape to the outside. Therefore, each place where that would be possible is called a leak.
“A leak is a hole in the world, where the inside of it is exposed to the (unwanted) outside region.” – CaBSP error message when a leak was found.
Examples for Leaks
Gaps in the geometry
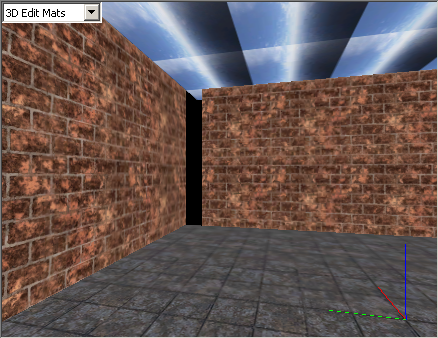
The example to the right shows a leak that is caused by an obvious gap in the geometry that leads to the void (the outer region). This is the classical example and most common type of leaks, and such leaks are usually easy to find and fix.
However, note that gaps like these can be very small, and often they're somewhere inside complex geometry. Don't hesitate to zoom close whenever the situation is not as obvious as in this example.
Inappropriate materials on outside walls
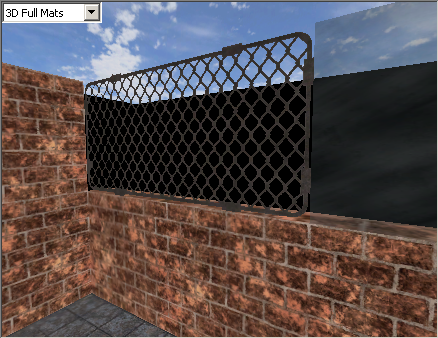
Materials that are see-through (like the grate in the center of the image) or translucent (like the glass pane to the right) cannot be used on outside walls as is this example, because such materials obviously don't seal the map.
To fix the problem, you either have to replace such materials with other materials that are solid, or make another room that has solid walls on the other side of (“behind”) these surfaces.
Note that contrary to the materials shown in this example, skydome materials do seal the map.
![]() How you do know which materials seal the map and which don't?
How you do know which materials seal the map and which don't?
→ Only those materials that have the bspPortals clip flag set in their material definition seal the map, all others don't. Future versions of CaWE will directly indicate the status of this flag in the Material Browser, but currently you have to look-up the definition of a material in its .cmat file to find out the status of this flag. Good news though is that most materials behave totally naturally:
![]() As a rule of thumb, if you can see through, then CaBSP can see through, too, and thus such materials cannot be used on outside walls.
As a rule of thumb, if you can see through, then CaBSP can see through, too, and thus such materials cannot be used on outside walls.
Terrains, Bezier Patches and Entities
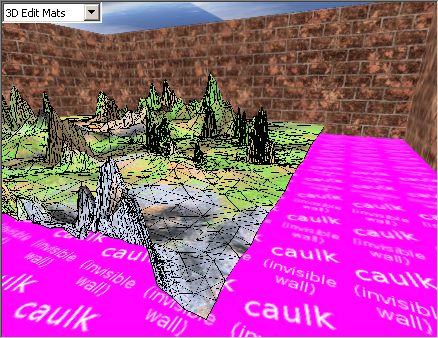
Terrain and Bezier Patch primites never seal the map, even if their material is solid. Therefore, if you dragged the terrain in this example to cover the entire floor, you still cannot expect it to prevent the map from leaking.
The same is true for brush entities, i.e. entities that are made from brushes. For example, if you make a func_wall or func_door entity and place it so that it appears to contribute to the outside wall, CaBSP will still report a leak, because only the global “world” brushes are taken into account for the sealing hull.
As shown in the image, the proper solution is to use the Textures/meta/caulk and other materials like walls and skies to make a “containing room” around such primitives and entities. The Textures/meta/caulk material is especially useful in such cases because it seals the map but doesn't render (is invisible) in the engine later.
The New Terrain tool assists you with constructing new terrains that have a proper containing room right from the start, and you may want to have a look at the TechDemo.cmap for a properly sealed terrain example.
Leaks due to bad brushes
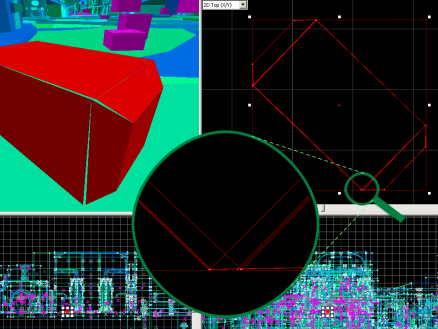
Sometimes leaks can also be caused by bad brushes like the one shown in this example (click image to enlarge). Such leaks are the most problematic: They are very hard to see visually, and they can get CaBSP thoroughly confused1). Even worse, usually not much helps but deleting the offending brush, and make it anew with the New Brush and other tools.
On the other hand, the occurrence of such bad brushes is rare. They sometimes exist as the result of importing a map from another game or editor, but are hard to create accidently in CaWE. As mentioned before, the best solution is to re-make the offending brushes, or put them into a separate entity, because only the world brushes contribute to the sealing hull, whereas the entities are treated independently.
Effects of a Leak
If your map has a leak, the CaBSP compiler will automatically detect it and consequently abort the compilation with an error message like this (if there is more than one leak in the map, only the first leak will be reported):
*** Fill Inside ***                                 0: 0: 1

### LEAK DETECTED! ###

A leak is a hole in the world, where the inside of it is exposed to the
(unwanted) outside region. Thus, a leak pointfile has been generated.
Load this file into the world editor CaWE, and find the beginning of the line.
Hint: The beginning is always near one of the "info_player_start" entities.
Then find and fix the leak by tracing the line until you reach the outside.
(The line always takes the shortest path, so this should be easy.)

Notes:
- Leaks can be *very* small. Use a close-up view, if necessary.
- Use the grid. The grid is useful to fix leaks + to avoid them from the start.
- Make sure that *all* "info_player_start" entities are inside the world!
- Be aware that both the clip hull and the draw hull must be sealed.
- Please refer to the documentation for additional information.

Pointfile written to Games\DeathMatch\Maps\LeakDemo.pts

FATAL ERROR: Stopped by leak.
Program aborted.
That means that with a leak in the map, you cannot run the map at all. As CaBSP doesn't write any output file in this case (except for the above mentioned pointfile), neither the subsequent compilers (CaPVS and CaLight), nor the Cafu engine itself can run the map.
Future versions of CaBSP may reduce the severity level of the occurrence of a leak from an error to a mere warning. This will allow you to run your map with Cafu even if it has leaks, but nonetheless will leaks remain a problem that should be fixed. Leaks always indicate that the map could not be optimally processed, and thus imply higher polygon counts and lower performance.
The next section will tell you how to find the leaks reported by CaBSP in the map.
Locating Leaks in the Map
Finding leaks is very easy: When CaBSP reports that it found a leak (see example error message and description above), it also creates a corresponding pointfile.
A pointfile is an auxiliary file that contains the description of a trail from one of the info_player_start entities to the outside. The leak is always located somewhere along that path.
For loading the pointfile into CaWE, simply open the relevant map in CaWE (File → Open…, if you haven't already), then select the Map → Load Pointfile menu item. CaWE assumes that you'll want to load the recently created pointfile for the currently open map, and thus asks for confirmation, e.g. like this:
 Click “Yes” (“Ja”) to open the suggested default pointfile, which is normally the desired action. Clicking “No” (“Nein”) will open a file selection dialog where you can choose a different file or cancel.
Here are example screenshots of a pointfile that has been loaded into an (unfinished) map:
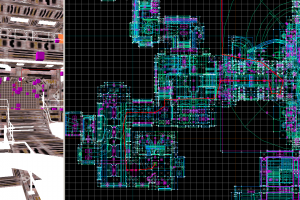
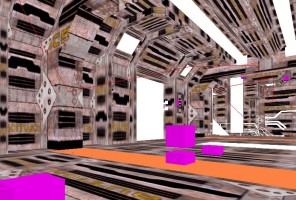 (Click on the images to enlarge them.)
Use the 2D views and especially the 3D camera view (see 2D and 3D Views for details) to follow the trail from the starting point near one of the info_player_start entities to the place where the line leaves the inside of the map and escapes to the outside. Fix the so found leak however seems appropriate.
You may notice that loading the pointfile can decrease the rendering performance in CaWE, especially if the trail is very long. Therefore, once you've found the leak, you can unload the pointfile again by selecting the Map → Unload Pointfile menu item.
Finally, restart the compilation (CaBSP) to check if the map is now completely sealed or if there are more leaks.
Preventing Leaks
The best way to deal with leaks is to prevent them right from the start. Here is a list of suggestions and considerations in this regard:
- Use the grid (Map → Show grid) and turn on grid snapping (Map → Snap to grid).
The grid and grid snapping are your most powerful allies when it comes to see and avoid leaks while you're constructing your map. - Run the Map → Check for Problems menu item occassionally and before compiling your map.
- Avoid all tools that potentially introduce rounding errors and thus misaligned brushes. As a gross guideline, all tools that operate on the grid and that are supposed to produce results on the grid are usually safe, such as resizing rectangular blocks, shearing, vertex manipulation, mirroring, clipping and carving. The following operations are sometimes less safe: Arbitrary (any angle) rotation and clipping and carving when the result has vertices that are off-grid.
For less-safe operations it is often better to try to mimic the same effect with the safer operations. For example, when you want to carve an arched door into a wall, cutting and placing the wall brushes manually is often better than employing the (more convenient) Tools → Carve tool.
Note that leaks are not ![]() prevented or fixed by putting the entire map into a big box, even if the strategy that has been suggested above for working properly with terrains might make you think so. Although putting everything into a big box will make CaBSP compile the map successfully and thus seemingly fix the leak, the problems associated with a leak (e.g. high polygon count and bad performance) will persist. This is not a solution.
prevented or fixed by putting the entire map into a big box, even if the strategy that has been suggested above for working properly with terrains might make you think so. Although putting everything into a big box will make CaBSP compile the map successfully and thus seemingly fix the leak, the problems associated with a leak (e.g. high polygon count and bad performance) will persist. This is not a solution.
Conclusion
Being able to load the CaBSP-generated pointfiles directly into CaWE makes finding and fixing leaks relatively easy. However, one of the most important aspects about fixing leaks is to prevent them right from the start.
Working carefully and making sure that brushes are properly aligned (snapped) to the grid can help significantly with avoiding leaks even before they occur. The cleaner and more organized you build your geometry, the easier will it be for you to not build them accidently into your map in the first place, and when they still occur, the easier they are to locate and fix.
In general, it's also a good idea to occasionally test-compile your map while it is only partially complete and still a work-in-progress. Besides that this will help you to fine-tune your geometry, it will also point out leaks one at a time, which makes finding and fixing a lot simpler and faster than later when your map is large and fully detailed.
See Also
Flash Tutorial – A short flash tutorial that presents the essentials about dealing with leaks.
