User Tools
Page Contents
The Edit Vertices (Morph) Tool
 The “Edit Vertices” tool (also called the “Morph” tool) allows you to edit the individual vertices of a brush and the control vertices of a bezier patch. (Please refer to The New Brush Tool and The New Bezier Patch Tool in order to learn more about how brushes and bezier patches are created.)
The vertices are the corner points of brushes. Being able to spatially manipulate them indiviually allows you to shape brushes in arbitrary ways that are difficult if not impossible to achieve with the other tools. Also the shape of bezier patches is controlled by special vertices that are called the control vertices of the patch. Modifying these control vertices indirectly modifies the shape of the bezier patch, so that they can be brought into every possible form.
Overview
Here is an overview of how the Edit Vertices tool is used:
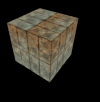
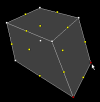
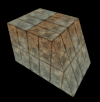
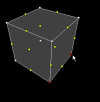
(Click each of the images below to see them in their larger, natural size.)
 Select the object (brush or bezier patch) whose vertices you want to edit with the Selection tool first. You can also select multiple objects for vertex editing at the same time, but it's not recommended.
  Use the mouse to select or drag the vertex or edge handles. The vertex handles are shown as white squares, the edge handles as yellow squares. When you left-click to select individual handles, note that you can use the
 CTRLkey in order to “toggle” the selection. (This works very much as with files in the Windows Explorer.) Selection and dragging works both in the 2D as well as the 3D views. When done, just leave the Morph tool e.g. by switching back to the Selection tool. CaWE will then render the resulting brush as usual.
The Convex-Hull Principle
For the purpose of editing brushes, the CaWE Edit Vertices tool is implemented according to the “convex-hull principle”. Roughly said, a convex-hull is the smallest space that contains a set of vertices. For a more thorough but mathematical definition please see the Wikipedia article here.
However, most CaWE users are already familiar with convex-hulls from another aspect of mapping, because they occur in a broader context: brushes! Each and every (valid) brush that you create with the New Brush tool is a convex hull of its vertices, and it stays that way no matter how you scale, rotate, shear, clip or morph it later.
Therefore, the morph tool operates by switching back and forth between the normal representation of a brush as you are used to, and it's convex hull representation. When you activate the Morph tool, the selected brush is first converted into its convex hull representation. Then, when you drag its vertices, you are actually dragging the vertices of the convex hull, and when you're done, the convex hull is just converted back into the normal brush representation. This works so well because brushes are per definition just another representation of the vertices of a convex hull – switching back and forth is mathematically a straightforward operation.
As a consequence, while it is impossible to use any of the other CaWE tools to turn a valid brush into an “invalid” brush (whatever that is), this statement also holds for the CaWE Morph tool! That is, it is quasi impossible to turn a valid brush into an invalid brush by dragging a vertex or edge handle1). This property makes CaWE different from map editors of other engines (e.g. the Valve Hammer Editor 4.0), where it is really easy to accidentally turn a valid into an invalid brush (which means lost work) with the Morph tool.
In summary, the convex-hull principle that is implemented in the CaWE Morph tool is a very powerful concept that makes vertex editing very simple and intuitive, and at the same time guarantees that you cannot accidentally make an invalid brush. Just try the CaWE Morph tool out for a while – and you won't go back to other map editors! ![]()
The Tool Options Bar
 When you activate the tool, the tool options bar shows controls that are specific to the Morph tool:
At the Edit radio buttons you can choose whether you would like to edit only the vertices (represented by white handles), only the edges (yellow handles), or both. Usually it's the easiest to leave the setting at both, but if you have a preference you can set it here. Note that only brushes have edges, the concept does not apply to bezier patches.
The Insert Vertices button inserts a new vertex into the center of a selected brush. It does only work if you have exactly one brush selected. That is, if you have instead a bezier patch patch selected or more than one brush or even a mix of multiple objects, it will just do nothing except for presenting you a message box that explains the exactly-one-brush requirement.
The inserted vertex will initially be located in the center of the brush. Thus, according to the convex-hull principle, it will be “loose” and initially not affect the shape of the brush. However, when you start to drag this vertex so that it becomes relevant for the convex hull, CaWE will automatically create the new shape of the brush according to the convex-hull principle.
The next section has a series of images that demonstrate how you use the Insert Vertices button at the example of a cube that gets two vertices added to form a more complex brush.
Face Splitting and Removal
Adding new faces to or removing existing faces from brushes naturally follows from the convex-hull principle. Please refer to the following image series in order to learn how new faces are added to a simple brush by first clicking the Insert Vertex button and then dragging the newly inserted vertex. In the second and fifth image, the new vertices that were inserted by a click on the Insert Vertex button have been selected (red squares) for better visual accentuation. The respectively next images (the third and sixth) show the result of these vertices being dragged into new positions.
(Click each of the images to see them in their larger, natural size.)
Faces are removed again my dragging one or more of their related vertices back “into” (somewhere near the center) of the brush or just onto other vertices. According to the convex hull principle, they then cannot contribute to the convex hull and thus the brush any more – the face has been removed. (Just read the above image sequence in reverse to see how this works.)
Note that for brushes, the Morph tool automatically eliminates duplicate vertices. That is, if you drag one vertex exactly onto another so that you cannot tell them apart any more, CaWE will just remove the duplicate vertex. This is also why pressing the Insert Vertices button does apparently nothing when it is pressed several times in a row: It just creates vertices all in the same place (the exact center of the brush), which are immediately collected again because they are duplicates of each other.
For bezier patches, being able to have multiple individual vertices all in the same place is sometimes a crucial feature, so the removal of duplicates does not apply.
Shaping Bezier Patches
When you use the Morph tool to edit the control vertices of bezier patches, the concepts of edges, convex hulls, vertex insertions and duplicate removals do not apply, but otherwise the tool behaves naturally and analogously to editing the corner vertices of brushes.
Selecting vertices individually
With bezier patches, it frequently occurs that multiple vertices are in the exact same position, overlaying each other. This is often intentionally and required to achieve certain spatial shapes. When you click on such vertices in the 2D views, they all get selected at the same time. This is usually what is wanted, but if instead you want to selected the vertices separately, just clear the selection and then click on the vertex in the 3D view. Contrary to the 2D views, selecting vertices in the 3D view only ever selects one vertex at a time. Although the situation looks visually the same as before in the 2D views, you can now use the mouse to drag the single vertex in the 2D or 3D views without affecting the others in the same place.


